About a month ago my friend from Minneapolis, Nancy, asked me to make a baby sweater for friends who are expecting a newcomer in September. I looked at this as a great opportunity to try something new in the baby sweater world. The gender is unknown, the sweater should be fully washable and made in the 6 to 12 month size. Over the years Nancy has housed me frequently when I've visited the Twin Cities. In fact she went so far as to let me take over her kitchen for an entire week to make my son's wedding cake in 2009. So this request was a very easy yes for me.
Nancy and I agreed this designed called the Sunnyside Baby Cardigan was perfect.
 |
| I'm making the cabled model on the right. |
Tanis Lavallee from Tanis Fiber Arts designed the pattern. You can find it
here on Ravelry for free. It is not a difficult thing to knit. One does start at the neck and the entire shoulders and neckline area are knit at once. (What's not showing in the photo above is that there are cables in the back running to the bottom of the armpits, just like on the front.) Then stitches for the sleeves are held while the two front pieces and the back are knit as one piece below the arms. Using DPNs the sleeves are then finished. Easy-peasy indeed.
The instructions call for a light-weight sock yarn, which as it happens I already had in my stash. (And in my reorganizing on Monday I found more so there's plenty of yarn to get the sweater made. [This was a bit of concern last week.]) It is a Regia Stretch sock yarn in a heather gray colour made of 70% washable wool, 23% polyamid and 7% polyester. This yarn will make a perfect indoor sweater for the chilly weather in Minnesota when it is needed. I even talked about starting this project on May 4 in my
Startitis post.
Perhaps that's why/when all the mischief began. I said I was then in the mode of starting lots of things so perhaps the knitting gods decided that meant I should be reminded that I do like to start things, even if it is over and over again.
In the first fifteen or so rows of this little sweater there are several things to remember. The vertical cables need to be established, there are increases to be done in proper places and in a certain way as the sweater grows from the neck to the shoulders and button holes and button bands need to be remembered. Again this is relatively simple stuff to do, but when I'm in startitis mode it seems difficult for me to remember to do all the parts at the same time. Either I'd forget to do the increases, or did them improperly, or I'd miss the cable cross row or mess up the button holes. Needless to say, I found I had to start this little sweater 12, yes count them T-W-E-L-V-E times before I got it right. So I have renamed the sweater; it is no longer the Sunnyside but rather for me the Tenacity Baby Cardigan.
There were some lessons learned from this adventure, despite my trying to ignore them:
- I can, at times, be very stubborn. (Too bad I'm not as tenacious about exercise!) This sweater was not going to win. I would have started it as many times as necessary to succeed.
- A lifeline did get me over the hump. I highly recommend using one always.
- I really learned to read my own knitting for this pattern. Once I had figured out what everything was supposed to look like, it was easy to determine what to do next. After about start #7, I hardly had to refer to the pattern. (Needless to say that caused its own set of mistakes.)
- Counting stitches, especially when the left and right side of the sweater are to be mirror images of each other, is vital. I had misinterpreted the instructions (in hindsight I see they were very clear) and added an extra stitch in each increase on the right side. So when it came to separate the sleeves from the body of the sweater there was no way the stitch count could work. A mistake like this means frogging down to where the increases begin, which was only ten rows into the project.
- This sweater is going to have a very soft neckline. Knit up and take out that neck about a half-dozen times and the wool really relaxes. This should be good for the baby. That's my story and I'm sticking to it.
- Finally, I love the feeling I now have that I finally conquered this thing. Perhaps this is something like what it would feel to climb Mt. Everest. Pure exuberance.
After approximately 60 rows (or starting just under the arm), things get very easy. All I have to do is remember the cables on either side and knit in stockinette, very super simple. My goal was to have this cardigan ready to go in early June and (I hope I'm not about the jinx it) it looks like that deadline can be met.
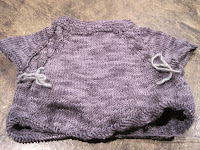
Here's where I am today with the
Sunnyside Tenacity Baby Cardigan. (She says as if victory is just within her grasp.)
 |
| The back |
 |
| The front |
 |
| A close-up of the front |


Comments
Post a Comment